Exploring BuildCores: 3D Airflow Visualization for Your Dream PC Build
Planning a new PC build often involves worrying about airflow—will your fans push cool air where it's needed, or will they recycle hot air? BuildCores, a parts-picking website, recently introduced a visual aid to help you get a rough idea. It's not a full simulation, but it lets you see where your intake and exhaust fans are pointing, using over 3,000 3D models. Below, we answer common questions about this tool, its limitations, and how it can help both beginners and experienced builders imagine their next rig.
What exactly is BuildCores and what new feature does it offer?
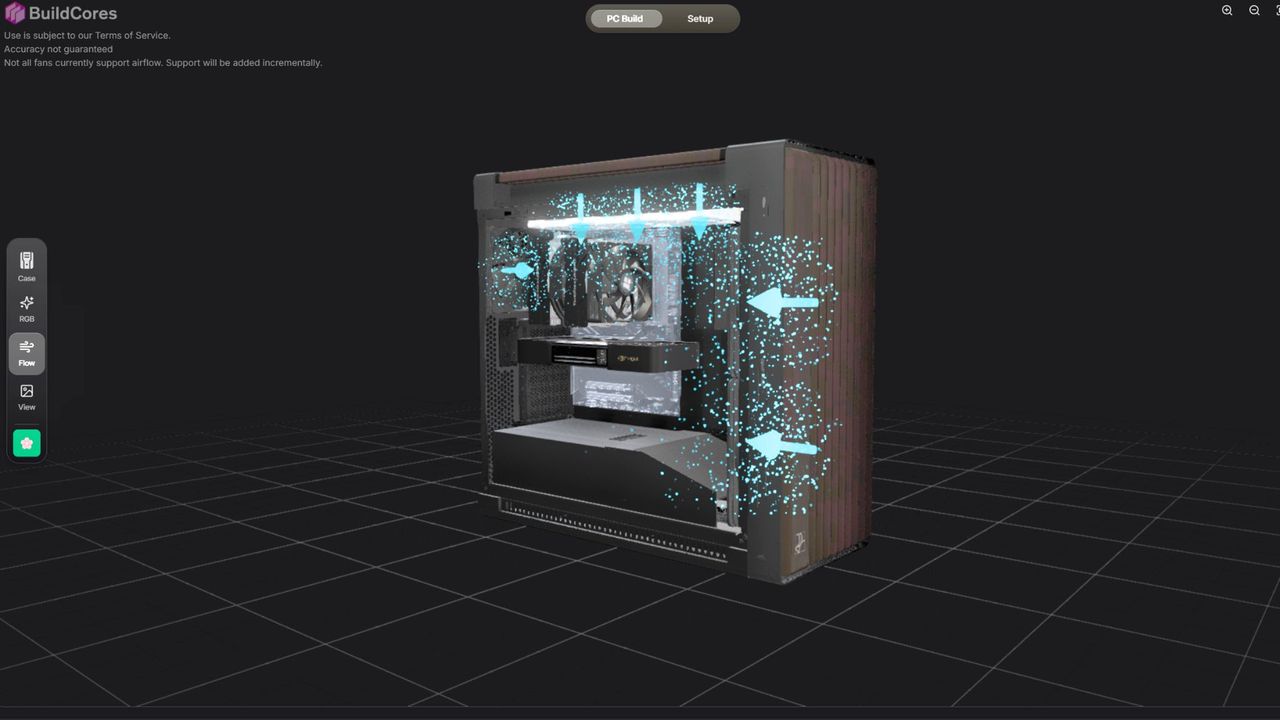
BuildCores is a website that lets you choose PC components and see them in 3D. It competes with sites like PC Part Picker, but its standout feature is a large library of 3,000+ modeled parts. The new feature is an airflow visualization mode. When you assemble a virtual build, you can toggle this mode to see colored arrows showing the direction of air movement—blue for intake, red for exhaust. It is designed to give builders a quick, approximate sense of how fans will interact, especially if they are unfamiliar with a case's layout. The creator, bosoxs202, described it as a visual configurator that simplifies fan orientation for beginners, not a full physics simulation.
How does the airflow visualization actually work?
The tool does not calculate real air pressure or account for obstacles. Instead, it uses the orientation of each fan in your build—whether it's set to pull air in (intake) or push air out (exhaust)—and displays that as a directional arrow. You can rotate and zoom the 3D model to see how the fans are positioned relative to components like the CPU cooler and GPU. It is meant to be a rough guide; for instance, if you place all fans as intake, you'll see many blue arrows pointing inward. The system cannot show how a large GPU might block airflow or how different fan speeds affect pressure. It's a visual approximation to help you check for obvious issues before you build.
What are the main limitations of this tool?
The most significant limitation is that it is not a full airflow simulation. It cannot model how a graphics card positioned below a fan could disrupt the flow, nor can it account for different fan speeds or static pressure ratings. The creator acknowledges this: in response to criticism, bosoxs202 said the feature is meant to be a beginner-friendly visual configurator, not a scientific tool. Users should not rely on it to guarantee thermal performance. Additionally, the tool only shows idealized arrows; it doesn't factor in case geometry, dust filters, or cable management. However, for planning basic fan layouts—like ensuring you have balanced intake and exhaust—it provides a helpful preview.
How does BuildCores compare to PC Part Picker?
Both sites allow you to pick components and check compatibility, but BuildCores emphasizes 3D visualization. PC Part Picker focuses on price tracking and community builds, while BuildCores lets you see a detailed 3D model of your entire rig, including the orientation of each fan. BuildCores offers over 3,000 3D models, so you can inspect how parts physically fit together. This is especially useful for cases you've never seen in person. However, PC Part Picker has a larger database and more user reviews. The airflow visualization is unique to BuildCores; no other part-picker provides that feature. For someone who wants to imagine their build before buying, BuildCores is a valuable alternative.

Can I use the tool to plan fan placement in unfamiliar cases?
Yes, that's one of its best uses. If you're considering a case you've never worked with, the 3D model lets you rotate the view and see where fans can mount. The airflow arrows then show you the default direction based on how you set each fan. You can experiment with different configurations—like moving a fan from the top to the front—and instantly see how the arrows change. This helps you understand whether the case supports your preferred setup. However, the tool doesn't simulate real-world air movement, so you should still check reviews or use a more advanced simulation for final tuning. It's a great starting point for visual learners.
What was the $70,000 build example mentioned?
The article's author decided to create the most expensive build possible on BuildCores, totaling around $70,000. It included a single high-end GPU, a monitor, and a massive 15 TB SSD. The point was to showcase the tool's ability to generate impressive (and unrealistic) setups. Even though the price tag is absurd, seeing the 3D model of such a build is fun. The author noted that with current memory prices making up about a quarter of PC costs, it's entertaining to play with a virtual build that you'd never actually buy. The airflow visualization for that build showed many intake fans—but without considering the actual thermal load, it was more for amusement than practical advice.