Building Your Own Apple Lisa on an FPGA: A Step-by-Step Guide
Overview
The Apple Lisa, launched in 1983, was a groundbreaking but commercially unforgiving precursor to the Macintosh. Known for its hefty price tag and sweeping graphical user interface, surviving Lisas are rare relics today—you won't find one at your local swap meet. But what if you could run Lisa's OS without tracking down an original? Thanks to AlexElectronics, a field-programmable gate array (FPGA) implementation now offers a surprisingly accessible path to experiencing this early GUI system. This guide walks you through recreating that FPGA-based Lisa, combining classic and modern interfaces, and leveraging open-source hardware principles.
Prerequisites
Required Hardware
- An FPGA development board with sufficient logic elements (AlexElectronics used a specific board; check the GitHub repo for exact model).
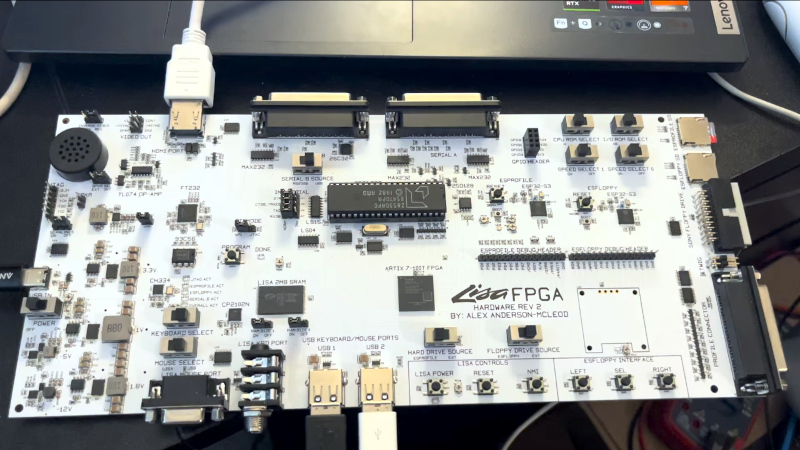
- Custom PCB (designed for this project) populated with connectors: HDMI output, SD card slot, USB host ports, original Lisa keyboard and mouse connectors, and a 40-pin DIP UART chip.
- USB keyboard and mouse (for modern input).
- HDMI monitor.
- SD card (for storage and OS image).
- Power supply for the FPGA board.
Required Software
- FPGA configuration tools (e.g., Xilinx Vivado or Intel Quartus, depending on the board).
- Serial terminal software (for UART debugging).
- A copy of the Lisa OS (original or emulated disk images).
Desired Skills
- Basic understanding of FPGA design (VHDL/Verilog).
- Soldering experience for assembly.
- Familiarity with vintage computer architecture.
Step-by-Step Instructions
1. Sourcing the Components
The project's GitHub repository (pending final release) will list all required parts. Key items include the FPGA development board, a custom PCB from a manufacturer like JLCPCB, and connectors. Notably, a 40-pin DIP UART chip is used because a pre-built UART module wasn't available for that specific FPGA. Ensure you source an original Lisa keyboard and mouse if you want full authenticity, though USB peripherals work too.
2. Assembling the PCB
The PCB is surprisingly large compared to the FPGA, housing a multitude of connectors. Begin by soldering all through-hole components: HDMI port, SD card holder, USB jacks, and the DIP UART. Surface-mount parts may be pre-soldered on the FPGA board itself. Carefully insert the FPGA board onto the PCB headers. Double-check polarity and orientation—mistakes here can be costly.
3. Configuring the FPGA
Download the bitstream file from the repository and load it onto the board using your FPGA vendor's software. This step implements the entire Lisa logic—CPU, memory mapping, graphics, and I/O—on the FPGA. Expect some debugging via the UART; connect it to your computer with a USB-to-serial adapter and open a terminal (e.g., PuTTY or screen) at 115200 baud. The FPGA will appear as a new virtual Lisa hardware.
4. Installing the Operating System
Copy the Lisa OS disk images (you can find them legally from vintage software archives) onto an SD card formatted with a compatible filesystem (likely FAT32). Insert the SD card into the PCB slot. Upon booting, the FPGA-based Lisa should load the OS. If not, use the UART to inspect boot messages—common issues include corrupted images or wrong format.

5. Connecting Peripherals
Plug in your HDMI monitor, USB keyboard, and USB mouse. Alternatively, connect an original Lisa keyboard and mouse via their dedicated ports. The project supports both simultaneously. The video output should display Lisa's iconic desktop. If the screen remains blank, verify HDMI handshake—some monitors need a specific resolution (check project docs).
Common Mistakes and Troubleshooting
- FPGA board not recognized: Ensure all power rails are stable and the configuration jumper is set correctly. Try a different USB cable for the board.
- UART no output: Check the baud rate and that the DIP chip is fully seated. Invert TX/RX if needed.
- SD card not detected: Format the card as FAT32, not exFAT. Use a small capacity (< 32 GB) for best compatibility.
- Keyboard not working: Original Lisa keyboards use a proprietary protocol; verify the PCB's pinout matches. USB keyboards should work without issue.
- Lisa OS freezes: Your disk image might be corrupt. Redownload and verify checksum. Also ensure sufficient FPGA resources—some boards require more logic cells.
- HDMI no signal: Some monitors expect a specific resolution (1280x1024 or 1024x768). Try a different monitor or use an HDMI-to-VGA adapter.
Summary
Recreating the Apple Lisa on an FPGA is a fascinating project that blends retro computing with modern reconfigurable hardware. By following these steps—sourcing parts, assembling the PCB, programming the FPGA, loading the OS, and connecting peripherals—you can experience one of computing's most influential (and rare) systems without needing an original. While the project is still in development, AlexElectronics has made significant progress, and the community eagerly awaits the final GitHub release. This guide gives you a head start, but always check the official repository for updates. Happy building!